


Lacquer
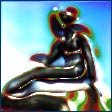
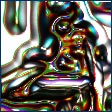
Lacquer is a plug-in filter for Photoshop and other paint programs. It produces shiny, glittery, glossy, sparkly results from nearly any image, with results that range from metallic to resinous to wet to weird.
To use this software, you need a paint program which accepts standard Photoshop 3.0 plugins.
Just put the plug-in filter into the folder where your paint program expects to find it. If you have Photoshop, the folder is Photoshop:Plugins:Filters or Photoshop:Plug-ins. You must restart Photoshop before it will notice the new plug-in. It will appear in the menus as Filters->Flaming Pear->Lacquer.
Most other paint programs follow a similar scheme.
If you have Paint Shop Pro: you have to create a new folder, put the plug-in filter into it, and then tell PSP to look there. In PSP's menus, choose File-> Preferences->General Program Preferences... and click the Plug-in Filters tab. Use a "Browse"button to choose the folder. The plugin will appear in the menus as Image->Plug-in Filters->Flaming Pear->Lacquer.
Lacquer builds a 3D surface from the brightness of your image and then lights this surface in several ways.
Blur controls the shape of the surface. Large blurs produce a smoothly rolling surface; small blurs produce sharper details.
Detail controls the amount of fine detail in the surface.
Bulge controls how high the bulges are. Generally, small values of bulge will make all the lighting effects more subtle.
Glass makes the surface look glassy.
Prism produces rainbow reflections.
Gradient produces metallic reflection.
The Grad colors buttons specify the hues of the metallic reflections. The left button is the color of the reflection on upward-facing surfaces, and the right button is the color of downward-facing surfaces.
Flat color controls the amount of the original image that appears in the output.
Sparkle produces tiny highlights when Glass is high.
Glitter makes shiny white highlights on the surface.
Edges produces bright lines that follow the curvature of the surface.
Lucidity gives stark contrast and more saturated colors.
Light Direction is the ball-shaped control. Changing the light direction will make the highlights and sparkle move around in response.
Glue defines how the image produced by Lacquer will combine with the original image. Normal mode replaces the original image entirely; the other modes produce a variety of colorful effects. Some of the modes are the same as those offered by Photoshop's layers.
Load (the red button) lets you open a settings file.
Save (the blue button) lets you save your settings in a file.
Randomize (the button with dice) chooses random values for all the controls. This is ideal for searching for new effects.
Try loading the settings files that come with Lacquer to see what it can do, or click the dice until you see something you like.
Here are some example effects that you can do. Open a favorite picture for these examples -- you won't see anything if you start with a blank canvas. Select part of the picture, and invoke Lacquer.
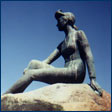 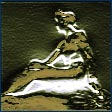 |
1. Metal. Set Blur to 40, Detail to 100, Bulge to 100, and Gradient to 100. Chose pale yellow for both grad Colors, and set all the other sliders to zero. This gives you a basic metallic reflection. If you want smoother reflections, reduce Detail and adjust Blur to your liking. |
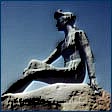 |
2. Simple embossing. Set Blur to 40, Detail to 100, Bulge to 100, and Flat Color to 100. All the other sliders should be zero. Your picture should have an embossed 3D look. Adjust the Blur, Detail, and Bulge sliders to tune the appearance. |
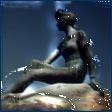 |
3. Glitter. Use the settings from example #2 above, but then turn up the Glass, Gradient, Sparkle, Glass, and Glitter sliders. You will see a glossy result. Move the ball control around to change the lighting. |
  |
4. Strange patterns. Click the dice button a few times until you see any glossy, smooth, lumpy effect. Apply it to your image. Then re-apply four or five more times. Feedback will produce rows of smooth ridges which will gradually obliterate the original image if applied enough times. |
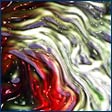 |
5. Lacquering. Lacquer can produce abstractions from the output of other filters like Twist and Silver. Here, a basic streaky pattern made with Twist has gained a 3D look by using Lacquer with glassy settings. |
Click the dice button to see more effects.
You can place an order online here. A secure server for transactions is available.
If you prefer, you can place an order offline by using the "Register" program that comes with the software.
Purchasing the software removes the time limit. You will get an unlocking code by email in a message titled "Thanks for your payment."
Answers to common technical questions appear on the support page, and free upgrades appear periodically on the download page.
Trouble with your order? Orders are handled by Kagi, which can be reached at admin@kagi.com .
For bug reports and technical questions about the software, please write to lloyd@flamingpear.com .